Waterproofing your truck cap is a must if you plan to keep it dry and away from bad weather. It also comes in handy if you want your truck to stay dust-free and have a constant temperature, without any concerning drops in the winter or record highs during the summer.
Making your own RV sounds all bells and sparkles until you realize that you might wake up with leaks in the morning or excessive dust. Therefore, we decided to help you out and propose two easy, but different methods to help you get your truck cap all waterproofed and ready for camping. Let’s take a look at a couple of these.
Waterproofing Your Truck Cap
Here are two popular methods of waterproofing your truck cap and what you need to get you started:
Method One
The first method is based on drilling the truck cap on the truck. All you need is a drilling machine and a screwdriver, but you should also get a large blanket to place your truck cap on, to avoid any damage to it. Having someone to help you manipulate the truck cap is a must. For this method, make sure you have the following tools and materials:
Tools
- Drilling machine
- Screwdriver
Materials
- Blanket to place the truck cap on
- Aluminum hardware clamps
- Truck bed insulation tape
- 3/8” locking nuts
- 1.5” bolts with 3/8” threading
- Washers for bolts
Spread out the blanket and put the truck cap upside-down on it. You might want to ask someone for a helping hand for this part.
Using the truck bed insulation tape, cover the bottom of the truck cap. Avoid the rear hatch; otherwise, you will not be able to manipulate the tailgate easily.
Tip: Put more layers of the tape around the bulkhead, so as to ensure that it is adequately sealed.
Open the tailgate of the truck.
Ask someone to help you flip the cap side up and place it carefully on the truck bed.
Ensure the truck cap is evenly placed on both sides of the truck bed.
Go inside of the back of the truck bed and apply the two aluminum hardware clamps against the truck bed rail and cap. If you have a toolbox or other accessories on the driver side or the passenger side, you may only clamp the other side.
Some truck caps already have holes. If not, drill holes on the sides of the cap, about 24-30 inches apart. Some truck caps might only have three holes, so you will need a fourth one in some cases, depending on how long the bed is.
Match a washer with each bolt and place the bolt in the hole. Once you put all the bolts, screw in the nuts to secure the truck cap.
Check whether the right rear taillight assembly has a hole. If you don’t have one, drill a small one for the truck cap taillight.
Take the taillight assembly away from the cap in order to locate the wiring.
Find the wire, make the incision, strip the case, and connect the high mount brake light.
Take back a piece of insulation from the brake wiring and attach the high mount stop light wire to the truck’s brake wire.
Method Two
If you do not have a drilling machine or you don’t want to use it, there is another easy method for you to follow up on. There are no tools involved, but you will definitely need someone to help you manipulate the truck cap. Ensure you have all your materials on hand before proceeding. Here’s what you need:
Tools
- None
Materials
- Industrial cleaning and degreasing solution (i.e., brake cleaner)
- Prime and paint (optional)
- Rubber weather stripping and glue
- RTV silicon
Clean the area where the truck cap will meet the truck bed. You can use any industrial cleaning and degreasing solution, such as a brake cleaner. Ensure all the dirt, grease, and debris are removed from the bed rails and for the truck cap surface, which will meet the bed rails. If you find any old weather stripping/glue, remove it from both surfaces.
Tip: You could prime and paint the truck cap surface and the bed rails for a better seal in the long term.
Place rubber weather stripping on the truck cap. You can find weather stripping at most auto shops, and it is affordable. You also need to purchase weather stripping glue so that you can apply it to the truck cap.
Apply a substantial amount of glue on the truck cap and carefully stick on the rubber stripping. The glue will dry very quickly and is extremely sticky, so make sure the stripping is all even, as you won’t get a chance to adjust it.
Some truck caps might have windows/doors and other openings. If that’s the case, seal these ones as well.
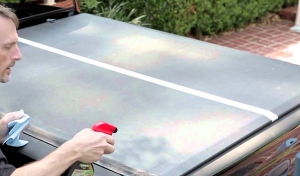
Check whether you sealed it thoroughly. Get a garden hose and pour water on the truck cap, while having a look inside and see whether any drops get in. If you have leaks, apply RTV silicone, which you can find in the auto parts shops. Make sure the area is completely dry before you apply a thin, solid bead in the leaking zone.
After it has cured, retest it and see whether it worked and check for other leak points, as well.
Wrapping Up
Knowing how to waterproof truck cap is important. Getting your truck cap waterproof and weatherproof is a must if you plan to turn it into a recreational vehicle and go camping. Our two methods allow you to do that simply and efficiently, although you might need someone’s help to manipulate the heavy truck cap.
Whether you want to use weather stripping and glue or you prefer to drill the truck cap on, this will definitely get you where you want. For an extra tip, if you plan to go camping during hot summer months, you might also consider painting the truck cap white, which will help maintain a lower temperature inside the truck.

Comments
Vivian Black
I love that you talked about cleaning the area the cap meets the bed and how you should make sure any old weather glue is removed. My husband and I are looking for a truck cap to put on his Ford F-150 so that we can cover the things in the bed while we move. We will keep these tips in mind as we search for a professional that can help us best.
Rhonda B
Thanks for this information. It’s the beginning of Autumn as my husband and I are making sure our truck cap on our Chevy Silverado 2500hd is ready for the wet season, it turns out that our truck cap needs all new weather proofing. After we did a intense washing test water was leaking all along the rear door of our truck cap.
Your advice in this article will be very helpful.
admin
Rhonda, I am so glad the article was helpful in weather proofing. Thank You for the comments.